How to Create an Online Store
Quick Start — Jump to your section
Add Your Store Details Add Your Items Configure Settings Publish and ShareSelling spirit wear, event merchandise, class supplies, or fundraiser items doesn't have to mean setting up a separate store somewhere else. SignUpGenius lets you list products, collect payments, and share your store in one place — no extra tools, no extra accounts. Here's how to get it set up.
Step 1: Add Store Details
The first screen in the builder covers everything shoppers see before they start adding items to their cart. Take your time here — your banner, title, and description are your store's first impression.
Add a banner
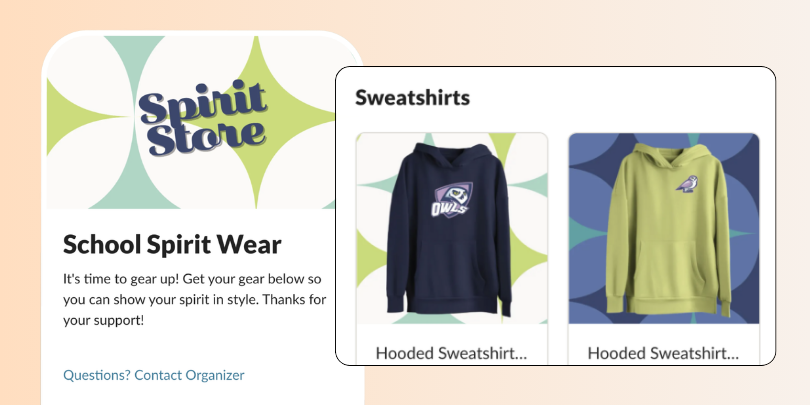
Click "Create a banner" at the top of the form to open the banner editor. You can add a single image or a carousel of up to four images — giving shoppers a visual preview of what you're selling before they scroll to the items. It's a quick way to make your store feel polished and on-brand, whether you're selling team gear, school supplies, or fundraiser merchandise.
Write a clear title and description
Your store title is required and appears at the top of your public page. Be specific. "Spring Fundraiser Shop" or "Fall [YEAR] Spirit Wear Sale" tells shoppers exactly what they're looking at and helps you stay organized when you run the same store again next year. "Booster Club Store" is easy to overlook.
Use the description field to tell shoppers what your store is about, how orders will be fulfilled, and anything else they need to know before checkout. The rich-text toolbar gives you headings, bold, italic, links, and lists — use them to make key details easy to scan.
Add a contact name and any attachments
Enter a contact display name so shoppers know who to reach with questions. If you have a flyer, size chart, or other relevant file to share, click "Add Attachment" to upload it directly to your store page.

Genius Tip
Upload a size chart as an attachment if you're selling apparel. It reduces "what size should I order?" messages before they start and helps shoppers commit to a purchase with confidence.
Set up FAQs
Scroll to the FAQs section and toggle it on to add questions directly to your store page. A refund policy is the most common one to include, but sizing guides, pickup instructions, and shipping timelines are all worth adding if they apply to your store.
Additional options
The Details page includes five optional toggles depending on what your store needs:
| Option | When to Use It |
|---|---|
| Fundraising goal | Set a monetary target — useful for school fundraisers or charity drives where momentum matters |
| Show total collected | Display a running total publicly to build excitement and encourage participation |
| Show participant list | Make the buyer list visible — good for community sales where social proof drives purchases |
| Date and time | Attach a specific date if your store is tied to an event or pickup window |
| In-person location | Include a physical address for pickup events or in-person sales |
When your details are complete, click the orange Save button to move to the next step.
Step 2: Add Your Items
The Items tab is where you build your product list. For each item, upload a photo, enter a name and description, set a price, and configure any quantity limits or variations. Add as many items as your store needs before moving on.
Now it's time to stock your store. You can add three types of items:
Donation Item
Accept a general donation or offer preset amounts for supporters to choose from. Works well alongside merchandise in a fundraiser store.
Basic Item
Add a name, price, and description. Configure availability windows, discounts, and any questions shoppers should answer before purchasing.
Item with Variations
Sell items like t-shirts that come in multiple sizes or colors. Set price and quantity at the variation level so inventory stays accurate automatically.
Product photos make a real difference. Shoppers are more likely to buy when they can see exactly what they're getting — especially for spirit wear or merchandise where color and design matter. If you don't have professional photos, a clean, well-lit shot on a neutral background works fine.
Use the Preview button at any point to see exactly what shoppers will see before you publish.
Need shoppers to sign a waiver or answer questions?
Add a form or waiver at the bottom of your items list. Build your question list, include any informational text, and add a signature line if shoppers need to acknowledge a policy or terms. Everything is collected in a single checkout flow — no second form to send, no separate follow-up to track.
Step 3: Configure Your Settings
The Settings tab controls how your store operates at checkout. It's organized into three tabs: Payments, Shipping and Discounts, and Access and Timing.
Payments
Credit card payments are always enabled. From there you can layer on additional options:
Payment methods: Toggle on eCheck to accept electronic check payments — keep in mind eChecks take up to five business days to process. Toggle on cash or check payments if you want to allow offline payments, and add mailing or delivery instructions so shoppers know exactly what to do.
Transaction fees: Toggle on fee coverage if you want to absorb the processing fee instead of passing it to shoppers. You can cover all fees, cover only eCheck fees, or give shoppers the option to voluntarily cover the fee themselves at checkout. If you go the voluntary route, write a short prompt — up to 220 characters — that explains why you're asking. A note about keeping more money going toward your cause tends to work well for fundraiser stores.
Receipts: Toggle on receipt customization to add a personal message at the top of every order confirmation. Use it to confirm what shoppers bought, share pickup instructions, add a thank-you note, or include any tax-deductible information that applies. A thoughtful receipt is the last impression your store makes — it reduces follow-up questions and gives buyers something to reference later.
Credit card statements: Toggle on statement customization if you want to control the name that appears on shoppers' bank statements. Keep it to something your buyers will recognize — up to 10 characters, no numbers or special characters — to reduce confusion and disputes.
Require payment for at least one item: Toggle this on only if every visitor to your store is expected to make a purchase. It prevents shoppers from reaching checkout without adding a paid item.
Taxes: Toggle on tax collection if your store requires it. Once enabled you can define tax rules that apply to the whole store or to specific items.
Genius Tip
Customize your receipt before you publish. It takes two minutes and eliminates the most common post-purchase questions — where to pick up, what's included, and who to contact with issues.
Shipping and Discounts
Shipping: Toggle on a flat shipping fee to charge a single delivery fee per order. Once orders come in, you can track shipping and print packing slips directly from your Manage view.
Discount codes: Toggle on discount codes and click "Add Code" to create one or more promotional codes shoppers can enter at checkout. Useful for early-bird pricing, member discounts, or donor appreciation offers.
Access and Timing
Timing: Toggle on start and end times to schedule your store's availability window. Shoppers who arrive before the store opens see a countdown clock. When the deadline passes, the store closes automatically — no manual intervention needed. Set this before you share your link so the deadline is built in from the start.
Access code: Toggle on an access code to restrict your store to invited shoppers only. Useful for member-only sales, internal group purchases, or pre-sales you want to keep private.
Visitor report: Toggle on the visitor report to collect the names and email addresses of everyone who views your store — not just those who make a purchase. This data is exportable from your Manage view and useful for follow-up outreach.
Step 4: Preview, Publish, and Share
Before you go live, click Preview to see exactly what shoppers will see — your banner, item listings, pricing, and checkout flow. If anything needs adjusting, use the left sidebar to jump back to Details, Items, or Settings.
When everything looks right, click the orange Publish button. Your store goes live immediately and is ready to accept orders. You can continue editing after publishing — going live does not lock your content.
From there you have several ways to get your store in front of shoppers:
Direct Link
Copy and share your store URL in emails, newsletters, or group chats. Shoppers don't need a SignUpGenius account to purchase.
QR Code
Generate a QR code for flyers, posters, event tables, or any printed materials. Shoppers who buy on the spot are shoppers you never have to follow up with.
Website Button
Embed a customizable button on your organization's website that links directly to your store.
Once published, sales, payments, and order tracking all live in your SignUpGenius Dashboard. No spreadsheet, no manual reconciliation, no separate system to check.
Frequently Asked Questions
Do I need a SignUpGenius account to create an online store?
Yes — you'll need a free account to get started. Once you're in, head to your Dashboard and select Online Stores to begin.
What types of items can I sell?
You can sell basic items, items with variations like t-shirts in multiple sizes or colors, and donation items with preset amounts. Most organizers mix and match based on what they're selling.
Can I limit how many of an item shoppers can buy?
Yes. For items with variations, you set quantity at the variation level. For basic items, you can configure availability and quantity limits in the item settings.
Do shoppers need a SignUpGenius account to purchase?
No. Shoppers click your store link, complete checkout, and receive an automatic confirmation. No account required on their end.
Can I restrict who sees my store?
Yes. Add an access code in your settings to limit store access to shoppers who have the code — useful for member-only sales or internal group purchases.
Can I run a fundraiser and sell merchandise in the same store?
Yes. Add a donation item alongside your regular merchandise and configure your fundraising goal and donor display settings in the Details step.
Can I edit my store after it goes live?
Yes. Publishing does not lock your content. Use the left sidebar to return to Details, Items, or Settings at any time to make changes.
What happens after someone makes a purchase?
Shoppers receive an automatic confirmation, and you can track orders and payments from your Dashboard in real time. Everything stays in one place — no separate system to reconcile.
Recent Resource Articles


This was our first year using SignUpGenius to coordinate volunteers for our girls Carmel High School swim team season. We absolutely loved it. It was so easy for volunteers to use and gave our coordinators the tools they needed to effectively manage the 240 volunteers for the multitude of activities throughout the five-month season.
Lisa Spitz